RTX2070をubuntuで使用したいと思って、いろいろとやってみました。
ubnutu18では先にも書きましたが、NVIDIA-Linux-x86_64-418.56.runというファイルをとってきて、インストールしました。しかしなぜか起動の際にVGAの解像度に戻ります。updateをするとよくそうなっていました。それでubunut16を試してみました。最終的にどうするかは決まっていないのですが、作業を記録しておきます。
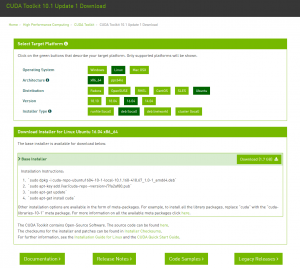
まず、このサイトからCUDAツールキットなるものを持ってきます(ここにはubnutu18用もあります。あとで試してみたい)。冒頭の図のようなサイトなのですが、debファイルを選択しました。ドライバーのインストールではなくいきなりCDUAのインストールです。ドライバーも同時に入るという記事をみて、そうしました。コマンドを記録します。
Installation Instructions:
`sudo dpkg -i cuda-repo-ubuntu1604-10-1-local-10.1.168-418.67_1.0-1_amd64.deb`
`sudo apt-key add /var/cuda-repo-version/7fa2af80.pub`
`sudo apt-get update`
`sudo apt-get install cuda`
version のところを実際に展開されたフォルダー名をみて変更しました。再起動をかけたら解像度がおおきくなりました。今のところ安定しています。pathを通せということで,.bashrc に下記を加えた。
export PATH="/usr/local/cuda/bin:$PATH"
export LD_LIBRARY_PATH="/usr/local/cuda/lib64:$LD_LIBRARY_PATH"
pip をインストールする必要あり。synaptic で,python3 の pip を入れた。その後,pip でcupy をインストールした。CUDA とバージョンを合わせて,インストール。
(For CUDA 10.1)
% pip install cupy-cuda101
残念ながら,まだ cupy が上手く動いていない。まだ続くもよう。
デモに関するサイトが在った。自分の環境だと下記のコマンドでホームにソースファイルがコピーされて、NVIDIA_CUDA-10.1_Samples フォルダーが作成された。
/usr/local/cuda/bin/cuda-install-samples-10.1.sh ~このあと、NVIDIA_CUDA-10.1_Samples フォルダーに入って make コマンドを打つ。
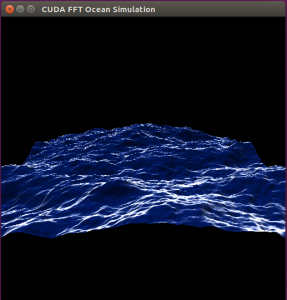
makebin/x86_64/linux/release フォルダーが作られて、その中に実行ファイルが出来上がった。oceanFFT などを試してみた。
今のところすべてのデモが動いているので CUDA は上手くインストールされているのではないかと思う。
(7月25日)cupy のインストールの続きです。だいたいはこのサイトにあるとおりにやってみました。コマンドとレスポンスをだいたいすべて下記に載せます。
friend@RTX2070:~$ pi
pi1toppm         pilconvert       pinentry-curses  pip3
pi3topbm         pildriver        pinentry-gnome3  pivot_root
pic              pilfile          pinentry-x11     pixeltool
pico             pilfont          ping
piconv           pilprint         ping6
pidof            pinentry         pinky
friend@RTX2070:~$ pip3 install -U setuptools pip
Collecting setuptools
  Downloading https://files.pythonhosted.org/packages/ec/51/f45cea425fd5cb0b0380f5b0f048ebc1da5b417e48d304838c02d6288a1e/setuptools-41.0.1-py2.py3-none-any.whl (575kB)
    100% |████████████████████████████████| 583kB 1.9MB/s
Collecting pip
  Downloading https://files.pythonhosted.org/packages/62/ca/94d32a6516ed197a491d17d46595ce58a83cbb2fca280414e57cd86b84dc/pip-19.2.1-py2.py3-none-any.whl (1.4MB)
    100% |████████████████████████████████| 1.4MB 1.2MB/s
Installing collected packages: setuptools, pip
Successfully installed pip-19.2.1 setuptools-41.0.1
friend@RTX2070:~$ pip
pip     pip3    pip3.5
friend@RTX2070:~$ pi
pi1toppm         pilconvert       pinentry-curses  pip
pi3topbm         pildriver        pinentry-gnome3  pip3
pic              pilfile          pinentry-x11     pip3.5
pico             pilfont          ping             pivot_root
piconv           pilprint         ping6            pixeltool
pidof            pinentry         pinky
friend@RTX2070:~$ pip freeze | grep cupy
cupy-cuda101==6.1.0
friend@RTX2070:~$ pip install cupy
Collecting cupy
  Downloading https://files.pythonhosted.org/packages/4d/08/2b25443d31ea34cdd259a689d67bc20f19df0c079e1f517ca1bd5bd7e6e2/cupy-6.2.0.tar.gz (3.1MB)
     |████████████████████████████████| 3.1MB 2.0MB/s
Requirement already satisfied: numpy>=1.9.0 in ./.local/lib/python3.5/site-packages (from cupy) (1.16.4)
Requirement already satisfied: six>=1.9.0 in ./.local/lib/python3.5/site-packages (from cupy) (1.12.0)
Requirement already satisfied: fastrlock>=0.3 in ./.local/lib/python3.5/site-packages (from cupy) (0.4)
Building wheels for collected packages: cupy
  Building wheel for cupy (setup.py) ... done
  Created wheel for cupy: filename=cupy-6.2.0-cp35-cp35m-linux_x86_64.whl size=24912682 sha256=9027a62f136c4600c08726ef6023747cb986b635f09120091110587a420d0ff0
  Stored in directory: /home/friend/.cache/pip/wheels/88/ee/ed/4b7d86efc252bb757081e4e20233aed65d5638d2c1762bc75f
Successfully built cupy
Installing collected packages: cupy
ERROR: Could not install packages due to an EnvironmentError: [Errno 13] 許可がありません: '/usr/local/lib/python3.5/dist-packages/cupy-6.2.0.dist-info'
Consider using the `--user` option or check the permissions.

friend@RTX2070:~$ sudo pip install cupy
[sudo] friend のパスワード:
sudo: pip: コマンドが見つかりません
friend@RTX2070:~$ whereis pip
pip: /home/friend/.local/bin/pip /home/friend/.local/bin/pip3.5
friend@RTX2070:~$ sudo /home/friend/.local/bin/pip install cupy
WARNING: The directory '/home/friend/.cache/pip/http' or its parent directory is not owned by the current user and the cache has been disabled. Please check the permissions and owner of that directory. If executing pip with sudo, you may want sudo's -H flag.
WARNING: The directory '/home/friend/.cache/pip' or its parent directory is not owned by the current user and caching wheels has been disabled. check the permissions and owner of that directory. If executing pip with sudo, you may want sudo's -H flag.
Collecting cupy
Requirement already satisfied: six>=1.9.0 in ./.local/lib/python3.5/site-packages (from cupy) (1.12.0)
Requirement already satisfied: numpy>=1.9.0 in ./.local/lib/python3.5/site-packages (from cupy) (1.16.4)
Requirement already satisfied: fastrlock>=0.3 in ./.local/lib/python3.5/site-packages (from cupy) (0.4)
Installing collected packages: cupy
Successfully installed cupy-6.2.0
friend@RTX2070:~$
確か synaptic から pip をインストールしたと記憶していますが,最初 pip ではなくて pip3 というコマンド名になっていました。それで pip3 を使って,setuptools と pip のアップデートをしました。そうすると今度は pip もコマンドに追加されました。
次は cupy のインストールです。しかし最終段階でインストール先のフォルダーに書き込めず失敗。それで sudo でやろうとしたのですが,今度は pip にパスが通っていなくて,pip の場所を探して再度実行しました。権限が無くてテンポラリーフォルダーに書き込めませんとエラーが出たのですが,なぜかインストールは完了したとのメッセージが返って来ました。先ほどコンパイルをしていたようなのでそのファイルを利用したのだろうか?そんなことってあるのかな?ともかくこれで cupy を使った簡単なコードが動くようになりました。
『ゼロから作る Deep Learning 2』の4章のコード(ch04/train.py)を動かしてみました。「config.GPU = True」を有効にするという本の記述に加えて,多少のコードの修正が必要となりました。下記に記事があります。
コードを写します。
- common.np中の np.add.at = np.scatter_add をコメントアウト
- common.layer中の Embedding 逆伝播の中を以下のif文に書き換え
- if GPU:
np.scatter_add(dW, self.idx, dout)
else:
np.add.at(dW, self.idx, dout)
これでやっと動きました。かなり速い。

